Blog

  • Content Engineering vs. Technical Writing: What’s the Difference?

    Content Engineering vs. Technical Writing: What’s the Difference?

    The term content engineer means different things depending on who is hiring.

    If you have encountered the term in job postings, community discussions, or vendor content and wondered how it differs from technical writing, you aren’t alone. Many technical writers already do much of what companies describe when hiring content engineers, so the roles can appear to overlap.

    That raises a reasonable question. Is content engineering a new name for technical writing, or does it describe a genuinely different role?

    This article compares the two based on how companies define content engineering in job postings. It examines what each role does, what employers expect, where they overlap, and whether technical writing has ever fully captured the work the role has required.

    By the end, you’ll have a clearer line between what each role produces, where they overlap, why the distinction matters, and who you should hire based on your company’s structure and needs.

    First, here are some common misconceptions about content engineering.

    Misconceptions about Content Engineering

    These are three common ways people define content engineering or describe what the role involves:

    1. A content engineer is an engineer who writes content. The definition is technically accurate in the same way “a software engineer is someone who writes software” is accurate, but it doesn’t tell you what the person actually does.

    By that definition, a mechanical or electrical engineer who writes installation manuals is also a content engineer. The description fits so broadly that it creates confusion about what the person does.

    If a software engineer does software engineering, then a content engineer should do content engineering.

    1. Content engineering is a new name for technical writing. Companies have repeatedly renamed technical writing as a discipline. Titles like content developer, information developer, and knowledge engineer have appeared, and each time the scope stayed the same while only the name changed.

    Mark Baker, author of Every Page is Page One, noted as far back as 2013 that “the constant and uniformly unsuccessful attempts to rename technical writing left many in the field hypersensitive” to yet another name for the same work.

    Many technical writers look at what people describe as the requirements for a content engineer and see things they already do, so the obvious conclusion is that the new role is another name. However, it raises the question of whether technical writing was ever a complete title for the role.

    1. Content engineering is about scaling content production. This is more common within the search marketing and B2B SaaS industry. Some vendors such as AirOps and another content marketing vendor define content engineering exclusively as building AI production pipelines for scaling content.

    In the developer tool space, content goes beyond blog posts. It also includes documentation. Content engineering could involve building drift detection systems, quality gates, review automation, and maintenance workflows.

    That work has nothing to do with producing more marketing pages.

    What a Technical Writer Does

    A technical writer’s primary output is content, including API documentation, integration guides, SDK references, tutorials, release notes, and changelogs.

    They research the product, talk to engineers, test the software themselves, and translate that understanding into content that developers can use.

    Beyond producing new content, technical writers maintain what already exists. When they spot inaccuracies or style issues in shipped content, they update the affected pages. When the product ships a new version, they revise the docs to match. This ongoing maintenance work is a significant part of the role and often takes more time than writing new material.

    Technical writers work within content systems. They open pull requests, follow the review process, and publish through the Docs as Code pipeline. The pipeline itself, however, isn’t their core responsibility. They operate inside the workflow rather than building or maintaining it.

    That said, the industry has been shifting. As companies adopted Docs as Code workflows, roles like documentation engineer emerged. These were people who owned the system for producing and maintaining documentation, rather than the content alone. Some technical writers moved into that work, a shift that predates the current content engineering conversation.

    What a Content Engineer Does

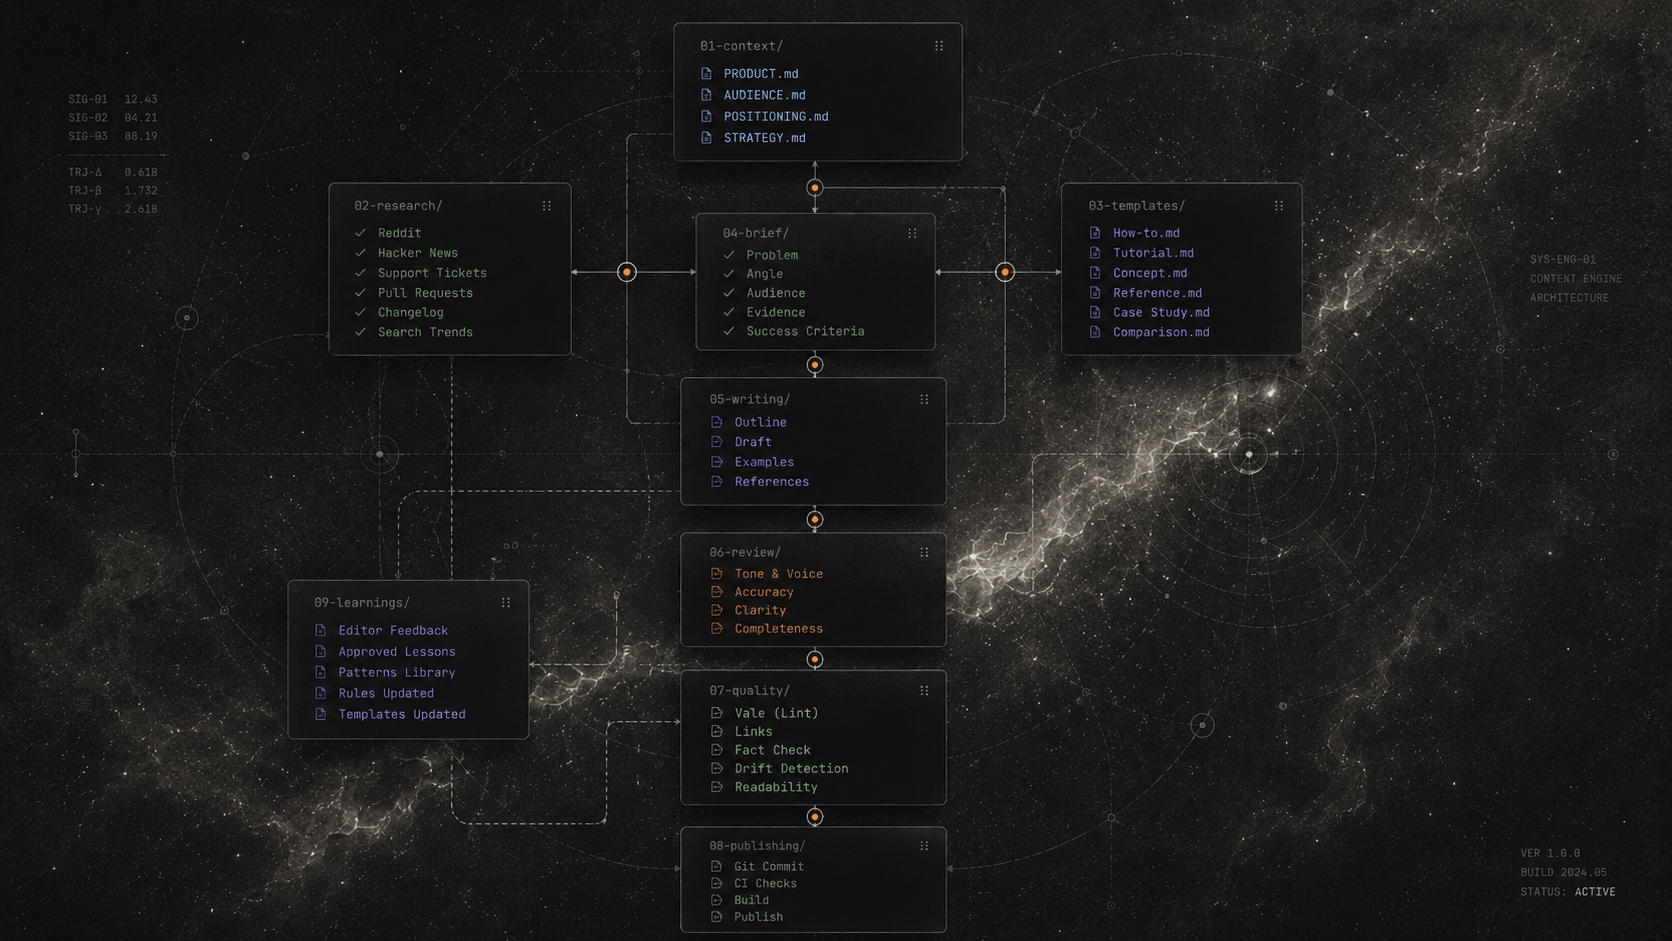
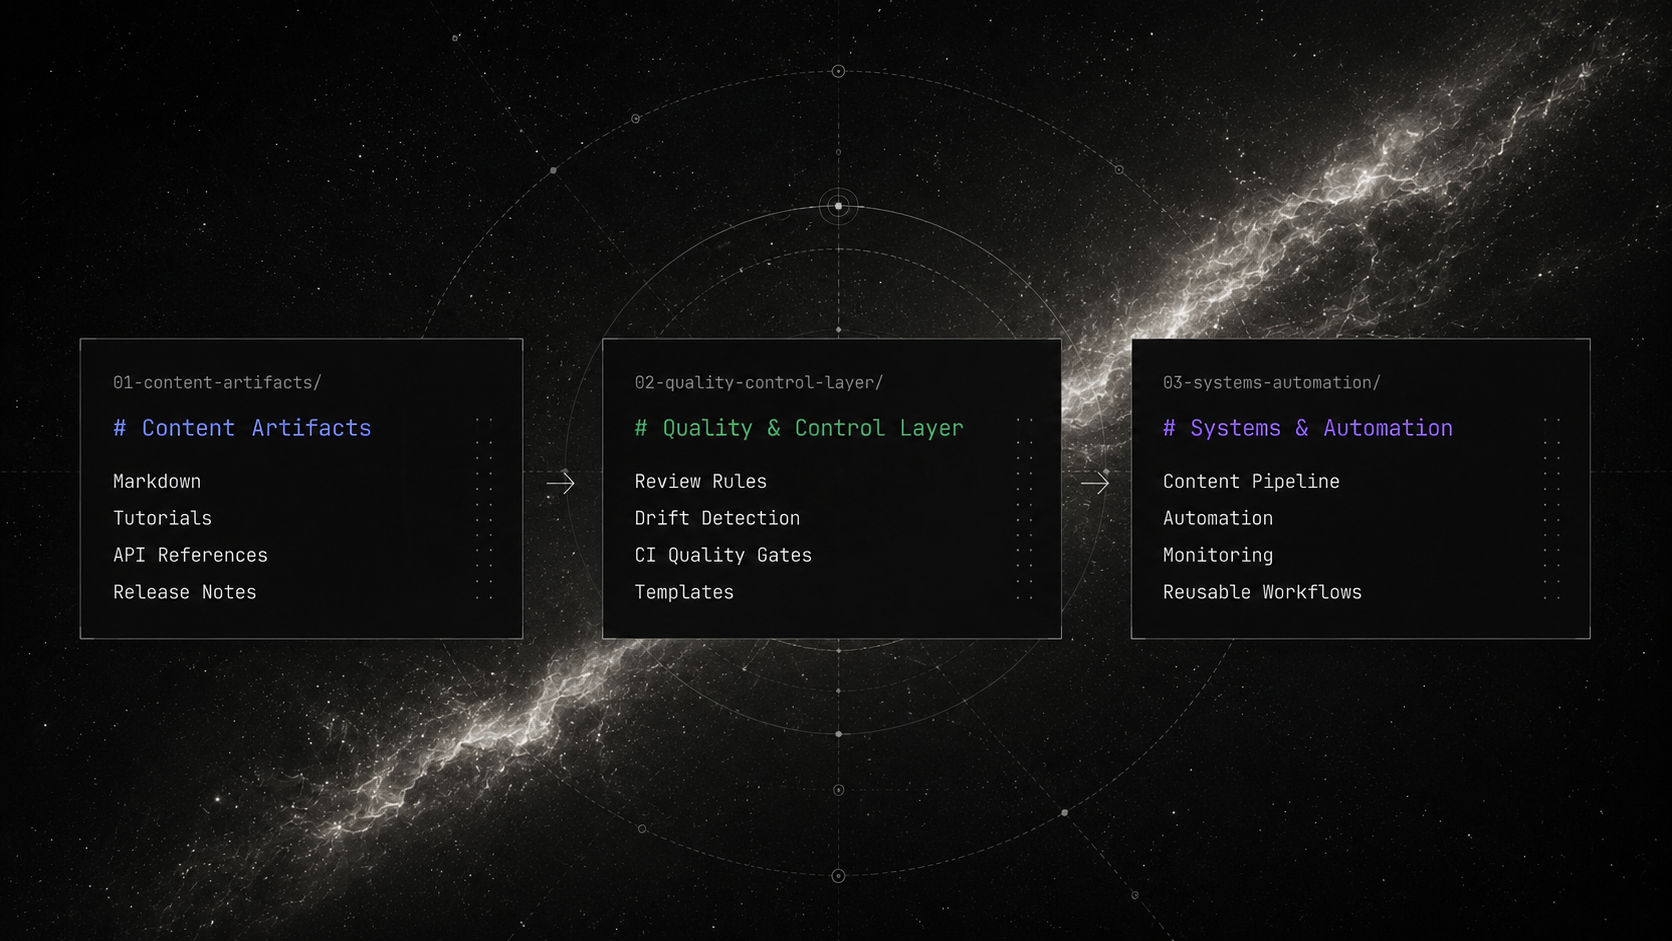
    A content engineer’s primary output is systems, not content. They build the infrastructure that content moves through, including pipelines, automation, quality gates, and workflows.

    Their work can involve building documentation systems, including drift detection that flags outdated docs when product code changes, prose linters, automated reviews in CI, maintenance workflows, and reusable templates that reduce effort per update. This is documentation engineering work.

    However, content engineering also covers marketing content systems, including production workflows, quality enforcement, topic research workflows, and maintenance automation that keep published blog posts and guides aligned with the product as it evolves.

    While documentation engineering covers docs infrastructure, content engineering extends that work to marketing systems as well.

    The Overlap and Difference

    Content engineers and technical writers share the same content environment, tooling, and quality concerns.

    Both roles use the same publishing environment, review process, and quality standards, which is why the distinction can feel blurry, especially in small teams where the same person may write content, maintain workflows, and improve the tooling around publication.

    If the primary responsibility is producing content, that’s technical writing. If the primary responsibility is building and maintaining the systems that content moves through, that’s content engineering.

    A technical writer improves the content inside the workflow. A content engineer improves the workflow itself, including the review rules, automation, quality gates, publishing process, and maintenance systems around the content.

    For practitioners who were already building pipelines, configuring automation, and designing workflows alongside their writing, “technical writer” was never the most accurate description of the full scope.

    Content engineering names that systems work more precisely.

    Deciding Who to Hire

    A technical writer’s job is as valuable as ever. The question is which role gets you to your goal faster, given your team’s structure.

    For teams with significant content volume, building systems that produce and maintain content delivers more leverage than managing each piece manually.

    If you already have a technical writer who’s been building tooling and automation alongside their content work, you could formalize that as their primary responsibility. They already understand the content, and now they’ll own the infrastructure as well.

    If the systems work is complex enough and your writer’s time is better spent on content, hiring a dedicated content engineer is the better move. That way, your writer isn’t split between deadlines and infrastructure, and your systems get the dedicated attention they need to stay reliable.

    Or you outsource the engineering work.

    TinyRocket builds content engineering systems for developer tool companies. Content pipelines, quality automation, drift detection, and production workflows keep the systems work off your team’s roadmap, so they can focus on producing and maintaining content. Whether you have a technical writer who needs systems support or no dedicated content person at all, book a workflow audit to map your current content workflow and identify which parts automation can handle.

  • How We Catch Documentation Drift with Pi and GitHub Actions

    How We Catch Documentation Drift with Pi and GitHub Actions

    According to Linear, teams using AI agents now ship 5x as many pull requests as two years ago, while Cursor’s data shows developers produce 2.5x as much code as 18 months ago.

    More code and faster shipping make documentation drift from the product. Documentation describes one behavior, while code produces another. This hinders adoption, breaks onboarding workflows, and can drive prospective users to competitors or frustrate existing ones.

    Tools such as Mintlify offer features to catch documentation drift and automatically update your docs. However, Mintlify’s implementation may not fit your existing workflow, and it locks you into its platform. This guide shows you how to build the same capability without locking into any specific product.

    This guide walks through the GitHub Actions workflow we use to catch documentation drift on pull requests with Pi, an open source agent harness. You can replicate the workflow on your own repository.

    We’re already running this setup on VectorLint, an open source content review harness we maintain at TinyRocket.

    Let’s get started.

    What You’ll Build

    By the end of this guide, you’ll be able to detect documentation drift in CI. You’ll have three pieces wired together:

    1. A GitHub App installed on the repository that gives the workflow permission to post comments
    2. An agent skill that tells the agent what counts as documentation drift
    3. A GitHub Actions workflow that orchestrates the check on demand, builds the agent’s routing message inline, and posts the result as a PR comment

    Note: The workflow flags documentation drift; it doesn’t create a PR or issue. That’s intentional. There could be false positives where the agent flags drift that isn’t user-facing. Automatically creating a pull request for each false positive only adds review work. You can build a downstream workflow that takes this workflow’s output and creates an issue or PR with an agent.

    Before You Start

    You need a few things in place:

    • A GitHub repository following a Docs as Code approach (documentation alongside the code, for example, /docs or a README markdown file)
    • Owner or member permission on the repository
    • A GitHub account with permission to create GitHub Apps (or an organization where you can create Apps)
    • An API key from an AI provider that Pi supports (Anthropic, OpenAI, Google, and others). This guide uses Amazon Bedrock. If you use a different provider, the only change is the authentication parameters.

    Pi is an open source coding agent that you run from the command line. It’s lightweight, provider-agnostic, and highly customizable, which is why we chose it for this guide. If you want to test the skill before committing it to CI, install Pi locally.

    Note: You can replace Pi with any other agent and get similar results. You’ll need to adapt the setup to how your agent works.

    Step 1: Create the Doc-Drift Skill

    Copy the doc-drift skill from the VectorLint repository into your project at .agents/skills/doc-drift/. The directory contains:

    • SKILL.md: the main instruction the agent follows
    • references/user-facing-criteria.md: defines what counts as a user-facing change
    • references/comment.md: defines the output format for drift reports

    The skill tells the agent to extract user-facing behavioral changes from a PR diff, search the documentation for claims those changes invalidate, and write a report for each finding.

    A user-facing change could be a renamed command-line flag, a new environment variable, a changed config key, or a rewritten error message. The skill ignores internal refactors, test changes, and anything with no observable effect on the user.

    Note: We built this skill for VectorLint, so it has hardcoded scope paths and repository references. To adapt it, change the scope paths and repository name in SKILL.md and update the criteria in references/user-facing-criteria.md to match your product. You can also hand the skill to an agent and ask it to adapt the references to your codebase.

    Step 2: Create and Install a GitHub App

    The workflow needs to post comments on pull requests. You can authenticate with either a personal access token or a GitHub App. A GitHub App is safer because you scope its permissions to exactly what the workflow needs. A personal access token tends to carry more permissions than necessary, which increases the blast radius if it’s ever exposed.

    Use GitHub’s guide on creating a GitHub App and grant it these permissions:

    • Issues: Read & write to post PR comments
    • Pull requests: Read & write for the eyes reaction and gh pr diff
    • Contents: Read for checkout

    After creating the App, grab the App ID and download your private key (a .pem file). Then install the GitHub App on the repository where the workflow runs. You’ll add both values as repository secrets in Step 4.

    Step 3: Build the GitHub Actions Workflow

    Create a file at .github/workflows/doc-drift.yml. Each section below covers one block of this file. The full workflow appears at the end for copy-pasting.

    The Trigger and the Authorization Guard

    To guard against cost and security overhead, a documentation check should only run when someone triggers it on a pull request, not on every push.

    name: Doc Drift Check
    
    on:
      issue_comment:
        types: [created]
    
    jobs:
      authorize:
        name: Check authorization
        runs-on: ubuntu-latest
        # Only run on PR comments that start with /check-docs (skip bots)
        if: |
          github.event.issue.pull_request != null &&
          startsWith(github.event.comment.body, '/check-docs') &&
          !contains(github.event.comment.user.login, '[bot]')
    
        permissions:
          issues: write
          pull-requests: read
          contents: read
    
        outputs:
          authorized: ${{ steps.auth.outputs.authorized }}
    

    The on: issue_comment trigger fires whenever a comment is created. The if: condition narrows triggering to comments on pull requests that start with /check-docs and skips any commenter whose login contains [bot], so bot accounts cannot trigger the workflow. The permissions block grants the minimum access the job needs; write access for comments comes from a GitHub App token (covered below), so GITHUB_TOKEN only needs read access to pull requests.

    To guard against unauthorized reviews, only repository owners and members should be able to trigger the drift check. This limits the cost of running AI models and reduces the surface area for prompt injection.

        steps:
          - name: Generate GitHub App token
            id: app-token
            uses: actions/create-github-app-token@bcd2ba49218906704ab6c1aa796996da409d3eb1 # v3.2.0
            with:
              app-id: ${{ secrets.APP_ID }}
              private-key: ${{ secrets.APP_PRIVATE_KEY }}
    
          - name: Check authorization
            id: auth
            uses: actions/github-script@f28e40c7f34bde8b3046d885e986cb6290c5673b
            with:
              github-token: ${{ steps.app-token.outputs.token }}
              script: |
                const association = context.payload.comment.author_association;
                if (!['OWNER', 'MEMBER'].includes(association)) {
                  await github.rest.issues.createComment({
                    owner: context.repo.owner,
                    repo: context.repo.repo,
                    issue_number: context.issue.number,
                    body: `@${context.payload.comment.user.login} Only repo owners or members can trigger doc drift checks.`
                  });
                  core.setOutput('authorized', 'false');
                } else {
                  core.setOutput('authorized', 'true');
                }
    

    The step reads author_association from the comment payload and allows OWNER and MEMBER. If the commenter is neither, it posts a rejection comment and sets authorized to false. Otherwise, it sets the output to true, allowing downstream jobs to proceed.

    Why a GitHub App token, not GITHUB_TOKEN: As covered in Step 2, issue_comment triggers on public repositories downgrade GITHUB_TOKEN to read-only. The App token you created in Step 2 bypasses this restriction, so every write step in the workflow uses it instead.

    This mitigates the risk of prompt injection since pull request titles, bodies, and comments are user-controlled strings.

    Note: Running an agent in a workflow carries some security risk. A malicious actor could create a pull request containing instructions to get your agent to expose secrets. To avoid that, only grant the minimum permissions your agents need to run. For more on this, read GitHub’s guide on mitigating cloud agent risk.

    Check Out the PR and Fetch the Diff

    The agent needs the diff to know what changed in the pull request and to check for behavioral changes.

      check-docs:
        name: Check documentation drift
        runs-on: ubuntu-latest
        needs: authorize
        if: needs.authorize.outputs.authorized == 'true'
    
        permissions:
          issues: write
          pull-requests: read
          contents: read
    
        steps:
          - name: Generate GitHub App token
            id: app-token
            uses: actions/create-github-app-token@bcd2ba49218906704ab6c1aa796996da409d3eb1 # v3.2.0
            with:
              app-id: ${{ secrets.APP_ID }}
              private-key: ${{ secrets.APP_PRIVATE_KEY }}
    
          - name: React to comment
            uses: actions/github-script@f28e40c7f34bde8b3046d885e986cb6290c5673b
            with:
              github-token: ${{ steps.app-token.outputs.token }}
              script: |
                await github.rest.reactions.createForIssueComment({
                  owner: context.repo.owner,
                  repo: context.repo.repo,
                  comment_id: context.payload.comment.id,
                  content: 'eyes'
                });
    
          - name: Get PR head SHA
            id: pr
            uses: actions/github-script@f28e40c7f34bde8b3046d885e986cb6290c5673b
            with:
              github-token: ${{ steps.app-token.outputs.token }}
              script: |
                const pr = await github.rest.pulls.get({
                  owner: context.repo.owner,
                  repo: context.repo.repo,
                  pull_number: context.issue.number
                });
                core.setOutput('head_sha', pr.data.head.sha);
    
          - name: Checkout main branch
            uses: actions/checkout@34e114876b0b11c390a56381ad16ebd13914f8d5
            with:
              ref: ${{ github.event.repository.default_branch }}
              path: main
              fetch-depth: 0
    
          - name: Checkout PR branch
            uses: actions/checkout@34e114876b0b11c390a56381ad16ebd13914f8d5
            with:
              ref: ${{ steps.pr.outputs.head_sha }}
              path: pr
              fetch-depth: 0
    
          - name: Setup Node.js
            uses: actions/setup-node@49933ea5288caeca8642d1e84afbd3f7d6820020
            with:
              node-version: '22'
    
          - name: Install Pi
            run: npm install -g @earendil-works/pi-coding-agent@0.79.6
    
          - name: Show Pi version
            run: pi --version
    
          - name: Fetch PR diff
            env:
              GH_TOKEN: ${{ steps.app-token.outputs.token }}
            run: |
              DIFF_PATH="$GITHUB_WORKSPACE/pr/.doc-drift-input.diff"
              gh pr diff --repo ${{ github.repository }} ${{ github.event.issue.number }} > "$DIFF_PATH"
              echo "Diff size: $(wc -l < "$DIFF_PATH") lines"
    

    The eyes reaction gives the reviewer immediate feedback that the command landed, before the run finishes. The Get PR head SHA step resolves the pull request’s current head commit, so the checkout targets the right ref.

    The workflow checks out two copies of the repository: main (the default branch, into path: main) holds the doc-drift skill and the current documentation the agent checks against; pr (the pull request’s head commit, into path: pr) holds the changed code. fetch-depth: 0 gives the agent the full repository history, which it uses to reason about how code and documentation relate. setup-node installs Node version 22, which Pi requires (@earendil-works/pi-coding-agent@0.79.6 needs Node ≥22.19.0). Pi is installed at a pinned version (@0.79.6) for reproducibility. The diff is written to pr/.doc-drift-input.diff so the agent can read it from the PR checkout.

    All actions are pinned to full commit SHAs for supply chain safety.

    Build the Agent Message

    You need to tell Pi where to find the diff, which skill to invoke, and where to write its reports. Rather than maintaining a separate script, the workflow builds this routing message with an inline bash heredoc.

          - name: Build agent message
            run: |
              WORKSPACE="${{ github.workspace }}/pr"
              DIFF_PATH="$WORKSPACE/.doc-drift-input.diff"
              cat > /tmp/pi-message.txt <<EOF
              You are running a doc drift check on a pull request in the VectorLint repository.
    
              The pull request checkout to inspect is located at:
                ${WORKSPACE}
    
              Read the PR diff from this file:
                ${DIFF_PATH}
    
              Use the doc-drift skill. When you have finished, write one report file
              per behavioral change you identified, named sequentially:
                ${WORKSPACE}/.doc-drift-1.md
                ${WORKSPACE}/.doc-drift-2.md
                ... and so on.
    
              If there are no issues to report, write a single file ${WORKSPACE}/.doc-drift-1.md
              containing the no-issues-found report.
    
              Do not post anything to GitHub directly. The workflow will handle posting.
              EOF
    

    The heredoc produces a routing message that tells Pi where the PR checkout lives, where to read the diff, and where to write its reports. The variables expand at runtime against github.workspace.

    The doc-drift skill it references lives at .agents/skills/doc-drift/, the same skill you created in Step 1.

    Run the Drift Check

    With the diff on disk, the routing message ready, and Node.js available, the workflow can run Pi and hand it the routing message. This is where the agent reasons about whether documentation needs updating.

    A CI runner has no interactive terminal, so Pi runs in a headless, non-interactive mode.

          - name: Run doc drift check
            working-directory: pr
            env:
              AWS_BEARER_TOKEN_BEDROCK: ${{ secrets.PI_BEDROCK_API_KEY }}
              AWS_REGION: ${{ secrets.PI_BEDROCK_REGION }}
              PI_MODEL: ${{ secrets.PI_MODEL }}
            run: |
              pi --no-session -p \
                --provider amazon-bedrock \
                --model "$PI_MODEL" \
                --skill ../main/.agents/skills/doc-drift \
                "/skill:doc-drift $(cat /tmp/pi-message.txt)"
    

    The step runs with working-directory: pr so Pi operates in the PR checkout. --skill ../main/.agents/skills/doc-drift points at the doc-drift skill in the main checkout (one directory up from pr). --no-session makes sure the session isn’t saved, and -p prints the response and exits. Both flags give you non-interactive execution.

    When the agent finishes, it writes one report file per behavioral change to numbered paths like .doc-drift-1.md, which the next step picks up. AWS_BEARER_TOKEN_BEDROCK, AWS_REGION, and PI_MODEL come from repository secrets you configure in Step 4.

    Post the Findings as PR Comments

    The agent is a language model, inherently nondeterministic. Letting it post directly to GitHub would make posting unpredictable. It could emit partial output, retry mid-run, or fail halfway through a comment. A file-based handoff sidesteps that.

          - name: Post report comments
            env:
              GH_TOKEN: ${{ steps.app-token.outputs.token }}
            run: |
              REPORT_FILES=$(ls "$GITHUB_WORKSPACE"/pr/.doc-drift-*.md 2>/dev/null | sort -V)
              if [ -z "$REPORT_FILES" ]; then
                gh pr comment --repo ${{ github.repository }} ${{ github.event.issue.number }} \
                  --body "Doc drift check completed but produced no output. Check the [Actions log](${{ github.server_url }}/${{ github.repository }}/actions/runs/${{ github.run_id }}) for details."
              else
                for file in $REPORT_FILES; do
                  gh pr comment --repo ${{ github.repository }} ${{ github.event.issue.number }} --body-file "$file"
                done
              fi
    
          - name: Post failure comment
            if: failure()
            env:
              GH_TOKEN: ${{ steps.app-token.outputs.token }}
            run: |
              gh pr comment --repo ${{ github.repository }} ${{ github.event.issue.number }} \
                --body "Doc drift check failed. Check the [Actions log](${{ github.server_url }}/${{ github.repository }}/actions/runs/${{ github.run_id }}) for details."
    

    The step lists all .doc-drift-*.md files in the pr checkout and loops through them, posting each one as a PR comment with gh pr comment --body-file. The agent never posts to GitHub itself. It only writes files, and the shell loop posts the comments to the PR, producing the same behavior on every run. The workflow passes the App token to gh pr comment for the same reason as every other write: GITHUB_TOKEN would 403 on issue_comment triggers for public repositories.

    The workflow owning all GitHub writes keeps the agent’s permissions minimal and makes every comment traceable.

    Two fallback paths handle edge cases. If the run produces no report files, a comment tells the reviewer and links to the Actions log. If the run fails outright, the failure() step catches the failure and posts a failure notice with the same log link.

    The Complete Workflow

    Here’s the full workflow for copy-pasting.

    name: Doc Drift Check
    
    on:
      issue_comment:
        types: [created]
    
    jobs:
      authorize:
        name: Check authorization
        runs-on: ubuntu-latest
        # Only run on PR comments that start with /check-docs (skip bots)
        if: |
          github.event.issue.pull_request != null &&
          startsWith(github.event.comment.body, '/check-docs') &&
          !contains(github.event.comment.user.login, '[bot]')
        permissions:
          issues: write
          pull-requests: read
          contents: read
        outputs:
          authorized: ${{ steps.auth.outputs.authorized }}
        steps:
          - name: Generate GitHub App token
            id: app-token
            uses: actions/create-github-app-token@bcd2ba49218906704ab6c1aa796996da409d3eb1 # v3.2.0
            with:
              app-id: ${{ secrets.APP_ID }}
              private-key: ${{ secrets.APP_PRIVATE_KEY }}
          - name: Check authorization
            id: auth
            uses: actions/github-script@f28e40c7f34bde8b3046d885e986cb6290c5673b
            with:
              github-token: ${{ steps.app-token.outputs.token }}
              script: |
                const association = context.payload.comment.author_association;
                if (!['OWNER', 'MEMBER'].includes(association)) {
                  await github.rest.issues.createComment({
                    owner: context.repo.owner,
                    repo: context.repo.repo,
                    issue_number: context.issue.number,
                    body: `@${context.payload.comment.user.login} Only repo owners or members can trigger doc drift checks.`
                  });
                  core.setOutput('authorized', 'false');
                } else {
                  core.setOutput('authorized', 'true');
                }
    
      check-docs:
        name: Check documentation drift
        runs-on: ubuntu-latest
        needs: authorize
        if: needs.authorize.outputs.authorized == 'true'
        permissions:
          issues: write
          pull-requests: read
          contents: read
        steps:
          - name: Generate GitHub App token
            id: app-token
            uses: actions/create-github-app-token@bcd2ba49218906704ab6c1aa796996da409d3eb1 # v3.2.0
            with:
              app-id: ${{ secrets.APP_ID }}
              private-key: ${{ secrets.APP_PRIVATE_KEY }}
          - name: React to comment
            uses: actions/github-script@f28e40c7f34bde8b3046d885e986cb6290c5673b
            with:
              github-token: ${{ steps.app-token.outputs.token }}
              script: |
                await github.rest.reactions.createForIssueComment({
                  owner: context.repo.owner,
                  repo: context.repo.repo,
                  comment_id: context.payload.comment.id,
                  content: 'eyes'
                });
          - name: Get PR head SHA
            id: pr
            uses: actions/github-script@f28e40c7f34bde8b3046d885e986cb6290c5673b
            with:
              github-token: ${{ steps.app-token.outputs.token }}
              script: |
                const pr = await github.rest.pulls.get({
                  owner: context.repo.owner,
                  repo: context.repo.repo,
                  pull_number: context.issue.number
                });
                core.setOutput('head_sha', pr.data.head.sha);
          - name: Checkout main branch
            uses: actions/checkout@34e114876b0b11c390a56381ad16ebd13914f8d5
            with:
              ref: ${{ github.event.repository.default_branch }}
              path: main
              fetch-depth: 0
          - name: Checkout PR branch
            uses: actions/checkout@34e114876b0b11c390a56381ad16ebd13914f8d5
            with:
              ref: ${{ steps.pr.outputs.head_sha }}
              path: pr
              fetch-depth: 0
          - name: Setup Node.js
            uses: actions/setup-node@49933ea5288caeca8642d1e84afbd3f7d6820020
            with:
              node-version: '22'
          - name: Install Pi
            run: npm install -g @earendil-works/pi-coding-agent@0.79.6
          - name: Show Pi version
            run: pi --version
          - name: Fetch PR diff
            env:
              GH_TOKEN: ${{ steps.app-token.outputs.token }}
            run: |
              DIFF_PATH="$GITHUB_WORKSPACE/pr/.doc-drift-input.diff"
              gh pr diff --repo ${{ github.repository }} ${{ github.event.issue.number }} > "$DIFF_PATH"
              echo "Diff size: $(wc -l < "$DIFF_PATH") lines"
          - name: Build agent message
            run: |
              WORKSPACE="${{ github.workspace }}/pr"
              DIFF_PATH="$WORKSPACE/.doc-drift-input.diff"
              cat > /tmp/pi-message.txt <<EOF
              You are running a doc drift check on a pull request in the VectorLint repository.
    
              The pull request checkout to inspect is located at:
                ${WORKSPACE}
    
              Read the PR diff from this file:
                ${DIFF_PATH}
    
              Use the doc-drift skill. When you have finished, write one report file
              per behavioral change you identified, named sequentially:
                ${WORKSPACE}/.doc-drift-1.md
                ${WORKSPACE}/.doc-drift-2.md
                ... and so on.
    
              If there are no issues to report, write a single file ${WORKSPACE}/.doc-drift-1.md
              containing the no-issues-found report.
    
              Do not post anything to GitHub directly. The workflow will handle posting.
              EOF
          - name: Run doc drift check
            working-directory: pr
            env:
              AWS_BEARER_TOKEN_BEDROCK: ${{ secrets.PI_BEDROCK_API_KEY }}
              AWS_REGION: ${{ secrets.PI_BEDROCK_REGION }}
              PI_MODEL: ${{ secrets.PI_MODEL }}
            run: |
              pi --no-session -p \
                --provider amazon-bedrock \
                --model "$PI_MODEL" \
                --skill ../main/.agents/skills/doc-drift \
                "/skill:doc-drift $(cat /tmp/pi-message.txt)"
          - name: Post report comments
            env:
              GH_TOKEN: ${{ steps.app-token.outputs.token }}
            run: |
              REPORT_FILES=$(ls "$GITHUB_WORKSPACE"/pr/.doc-drift-*.md 2>/dev/null | sort -V)
              if [ -z "$REPORT_FILES" ]; then
                gh pr comment --repo ${{ github.repository }} ${{ github.event.issue.number }} \
                  --body "Doc drift check completed but produced no output. Check the [Actions log](${{ github.server_url }}/${{ github.repository }}/actions/runs/${{ github.run_id }}) for details."
              else
                for file in $REPORT_FILES; do
                  gh pr comment --repo ${{ github.repository }} ${{ github.event.issue.number }} --body-file "$file"
                done
              fi
          - name: Post failure comment
            if: failure()
            env:
              GH_TOKEN: ${{ steps.app-token.outputs.token }}
            run: |
              gh pr comment --repo ${{ github.repository }} ${{ github.event.issue.number }} \
                --body "Doc drift check failed. Check the [Actions log](${{ github.server_url }}/${{ github.repository }}/actions/runs/${{ github.run_id }}) for details."
    

    Step 4: Configure the Secrets

    Add five repository secrets under Settings → Secrets and variables → Actions in your GitHub account.

    GitHub App secrets:
    APP_ID: the numeric App ID from the App’s General settings page
    APP_PRIVATE_KEY: the contents of the .pem private key file

    Provider secrets:
    PI_BEDROCK_API_KEY
    PI_BEDROCK_REGION
    PI_MODEL

    For other providers, change the --provider flag in the workflow and the environment variable names to match. For example, Anthropic needs --provider anthropic and only two secrets ANTHROPIC_API_KEY and PI_MODEL. Check the Pi provider documentation for the environment variable your provider expects.

    Step 5: Test the Workflow

    On any pull request, leave a comment starting with /check-docs as a repo owner or member. The workflow confirms you’re authorized, runs the agent against the PR diff, and posts one comment per behavioral change the agent found. Here’s a drift finding:

    ## ⚠️ Doc drift - renamed the `--output` flag to `--format`
    
    ### `docs/guides/cli-reference.md` - Output formats
    
    **What the doc claims:** "Run `vectorlint doc.md --output line` for terminal output."
    **What's now true:** The flag is `--format`, not `--output`.
    
    Fix prompt:
    ~~~
    `docs/guides/cli-reference.md`, Output formats: "--output" is no longer accurate - the flag is now `--format`. Update it. Keep all existing structure, tone, and style.
    ~~~
    

    Every surfaced drift finding has a fix prompt. The check tells you what broke, and the prompt gives you a starting point to fix it.

    Not every PR drifts documentation. When the agent finds a new user-facing change that isn’t documented yet, the comment names the change and its location. When nothing needs attention, you get a confirmation comment with the files and changes it checked.

    Handling False Positives and Negatives

    AI models are probabilistic, so there’s bound to be some false positives and negatives.

    The agent might flag product changes as documentation drift when they aren’t, or miss drifts when a PR genuinely invalidates documentation.

    When you notice either problem, update the instruction in the docs-drift skill. Add a concrete instruction that names the pattern, states what the agent should do differently, and includes an example if the rule isn’t obvious. Then test it locally on the same code change to verify it covers the edge case.

    These misses are less frequent with more capable models. If you observe consistent false positives or negatives, consider upgrading to a more capable model.

    Resolving the Doc Drift

    At this point, your workflow catches documentation drift at the PR level. When a PR changes documented behavior, the agent flags it in the PR itself, no platform required.

    The simplest approach to resolving the drift is to update the documentation in the same PR. You can hand the fix message to an agent to update the relevant docs, or build an agent workflow to create a PR based on detected drift.

    You’ll need guardrails, constraints, and verification signals to keep the agent’s output accurate, on-style, and useful. These would let you quickly confirm the agent’s work is correct and provide feedback so the agent can self-correct.

    Building those guardrails is a project in itself and requires iteration. You need style-aware instructions, verification checks, and feedback loops that let you quickly assess the agent’s output and improve performance over time.

    For teams without a dedicated docs engineer, hiring an external documentation engineering service is often more cost-effective and efficient.

    At TinyRocket, we build automated workflows, agent skills, verification loops, and tools that help teams keep documentation in sync with their product. Our agentic workflows let your team focus on building while reducing documentation work to a matter of quick judgment. Book a call today to get a free documentation workflow audit.

  • What Is Content Engineering for Developer Tools?

    What Is Content Engineering for Developer Tools?

    Content engineering, or content operations engineering, has a slightly different definition depending on who you ask.

    In enterprise content management, it means applying engineering principles to structure content into reusable modules, manage metadata and taxonomies, and deliver content across channels.

    In marketing and search engine optimization (SEO), it means building workflows, automation, and AI to create, update, and distribute content at scale.

    For developer tool companies, content engineering is an extension of documentation engineering.

    Documentation engineering is the practice of building systems that keep docs aligned as the product evolves. Content engineering extends it to marketing content by building workflows, quality gates, and automation that keep blog posts, tutorials, guides, and launch pages in sync with the product as it ships.

    Regardless of how each industry defines it or the tools involved, the common goal is to treat content as a systems problem rather than a series of one-off deliverables.

    Content engineering is emerging now because teams want to use AI to gain efficiency and scale content without a proportional increase in effort. AI tools can produce content quickly, but teams have realized that speed without a system leads to inconsistent quality.

    This is especially important for developer tool companies as AI increases development velocity.

    Why Developer Tools Need Content Engineering

    More features shipping faster means more content to produce and maintain, more frequently. For developer tools that pose a risk of content drifting from the product.

    Documentation is part of the product, and developers judge your tool by how well your docs help them ship. So when content is out of sync with your product, developer experience degrades.

    A stale code sample, a deprecated API reference, or a tutorial that no longer reflects the current UI would cause developers to spend more time verifying your tool instead of building with it.

    It also affects how you get surfaced in AI search. AI assistants that read your content use your documentation and marketing pages as a retrieval context. If your docs and marketing pages are factually inconsistent or riddled with terminology inconsistencies, they can surface contradictory product explanations or omit your product altogether.

    The good thing is that developer tool companies already use foundational infrastructure such as Git and running CI/CD pipelines, so adopting content engineering practices is a natural extension.

    If you’re already practicing Docs as Code, content engineering builds on that foundation.

    What Content Engineering Looks Like in Practice

    Whatever happens repeatedly in your editorial workflow is a candidate for automating away in a content system. It could be fixing broken links, handling drift, or fixing terminology inconsistencies.

    For instance, if your docs live in the codebase, you can detect documentation drift by using a code review tool that can inspect pull requests for changed features and flag affected content for review. Tools such as Qodo and CodeRabbit does this quite well. If your docs live outside the repository, however, you would need to build a system that monitors releases or change logs, cross-references them with the content, and surfaces outdated pages.

    Surfacing outdated pages could then automatically create a GitHub issue or a Slack notification to update the team.

    AI can reduce manual work, but it shouldn’t make decisions for you. An agent can read and identify the sections that need changes, suggest revisions, and draft a first pass, but a human should still make the final decision to publish.

    Although AI workflows can speed up work, a human still needs to remain accountable.

    How Content Engineering Supports Developer Marketing

    Content engineering supports developer marketing by helping you decide what to publish, write it, review it, and keep it consistent as your product changes.

    You can build a repeatable workflow with a topic backlog, a brief template, a source-gathering step, quality checks, and a publishing process to bring in users, create search entry points, and explain your product well enough to earn trust.

    This is how we built our demand generation workflow. We use AI for topic research and prioritization, while a human (just me for now) signs off on what to write, and briefs before handing it off to an agent who writes the first draft.

    After that, the draft goes through automated quality checks, the agent revises until it meets our quality benchmark, and the human gives the final review. This setup enables one person to keep content moving while also handling software engineering work.

    It could also be an event-driven system.

    A feature launch can trigger an event that creates a content backlog, generates a brief from the changelog and source docs, drafts a tutorial or comparison post, and then runs checks for claims, terminology, and links before human review.

    Whatever workflow is implemented, it must make content creation faster without sacrificing quality.

    Benefits of Adopting Content Engineering Practices

    Implementing a content system reduces content drift and maintains a good developer experience.

    A content system also enforces consistency, making it easier for AI systems to trust and cite. Consistent, technically grounded content gives AI systems an unambiguous representation to work from, improving search visibility.

    It also ensures that content quality doesn’t slip as you scale volume. Enforcing quality checks at the writing and submission stages helps you expand your topical coverage while keeping every piece aligned with the same standards.

    Building a content system is also cost-effective. Not only does it reduce the workload on already overloaded technical writers or engineers, but it also enables you to scale production without a proportional increase in effort and resources.

    Snyk was able to scale its developer marketing strategy by adopting content engineering practices, scaling its developer content production, and driving hundreds of thousands of additional web sessions

    In-House vs Outsourcing Content Engineering

    You could hire a content engineer to build your content system, or have an in-house technical writer fill the role.

    Building a content system is ongoing work, though. The content engineer builds workflows, connects product development to content systems, adds quality gates, sets up knowledge bases, and improves the AI-assisted components when new tasks break the system. AI outputs aren’t deterministic, so the workflow needs ongoing calibration against your quality standards.

    Technical writers already juggle documentation, reviews, and contributor support. Adding content engineering to their tasks forces them to context-switch between writing and systems work, which can lead to more content debt or an inefficient system.

    At TinyRocket, we build content systems for developer tool companies when your team doesn’t have the capacity to take it on without diverting from the roadmap. We connect pull requests, releases, and change logs to your content inventory, route updates to the right owner, and set up quality-gated production workflows that keep documentation and marketing content aligned with product development.

    Book a free workflow audit for an analysis of your editorial process to see where you could automate or apply AI to keep your docs aligned or produce more developer content without sacrificing quality.

  • Why You Need to Stop Enforcing Style Guides Manually

    Why You Need to Stop Enforcing Style Guides Manually

    You can get away with manual reviews as your only content quality gate when you’re the only contributor.

    However, the moment you have multiple people contributing to your content, quality issues start to slip through.

    A few engineers start updating docs, a PM adds launch notes, and someone copies an older page because it’s faster than starting from scratch. Then the same product starts getting described three different ways, section structures drift, and review quality depends on who opened the pull request that day.

    One page says “API key” while another says “access token,” and one update opens with a task list while the next opens with product copy.

    None of those issues is hard to spot in isolation, but catching them consistently across every contribution is challenging.

    To ensure you publish content that builds developer trust, you need to automate your content review workflow.

    Review Content How Developers Review Code

    Automated testing is a critical part of reliable software delivery, so development teams write tests and automate their execution in a CI/CD pipeline.

    When a developer opens a pull request on a version control platform such as GitHub, tests and linters run, and bugs and poorly written code are flagged immediately.

    You can do the same with your content by adopting a Content as Code workflow.

    Content as Code is the adoption of similar workflows that developers use to ship code to ship content. Just as developers use linters to check their code in CI pipelines, you can also use prose linters such as Vale or VectorLint to automatically flag issues in your content.

    Both tools are command-line prose linters that let you define rules based on your style guides and automate the checks in a CI/CD pipeline. You can catch spelling and terminology issues automatically, as well as issues that require contextual judgment, such as repetition and directness. So, rather than relying on manual reviews or using ChatGPT or Claude, you can use prose linters to automatically catch quality issues.

    Not that there’s anything wrong with using ChatGPT or Claude. The issue is that they’re not deterministic. A slightly different prompt can give a different result. So, while they might speed up your manual review process, they can’t consistently help you catch quality issues.

    With prose linters, you can catch terminology inconsistencies, AI patterns, passive voice, repetition, etc. You could even check for broken links with tools like Lychee and markdown structure with Markdownlint.

    By shifting from manual to automated style guide enforcement, you can catch recurring quality issues while focusing on the parts that require human validation, such as accuracy and taste.

    Setting Up Your Content as Code Workflow

    Use Git to track every change, and give contributors a structured way to submit updates for review.

    You don’t need to be deeply familiar with it. You can use coding agents like Claude Code or Codex to handle routine operations, including staging, committing, and opening pull requests.

    Once your content is in Git, set up your prose linters in CI. Use Vale for rule-based checks. It covers terminology, capitalization, heading conventions, and banned phrases.

    For anything requiring context, AI writing patterns, repetition across sections, or unsupported claims, use VectorLint. If you’d rather not maintain both tools, use VectorLint on its own. You can catch the same quality issues Vale does, but it incurs large language model (LLM) token costs and isn’t deterministic. Because VectorLint runs on an AI model, there’s a chance it may miss issues that Vale would consistently catch.

    What you gain, though, is a simpler setup with one tool and one config file to maintain.

    Add Lychee to your CI pipeline to catch dead links before they reach production. Once this is running, contributors get feedback on their changes before you ever look at the PR.

    Automate the Most Repetitive Issues First

    Scan your last few reviews. If the same terminology swap, heading fix, or structural note keeps coming up, turn it into a rule.

    For patterns like preferred terminology, capitalization, and banned phrases, write those checks directly in Vale. Existing style guides from companies like Google, Microsoft, and Datadog give you a starting point, so you don’t have to write all the rules from scratch.

    If there’s a rule that’s not in these company style guides, you can use an AI tool to write it.

    For issues that require contextual judgment, such as detecting AI patterns, identifying repetition across sections, and flagging unsupported claims, use VectorLint.

    VectorLint also ships with preset rules, but you can create rules by describing them in natural language or by using your existing style guide directly.

    There’s Some Maintenance Tax to It

    Maintaining the rules takes time.

    A Vale rule might catch a phrase you wanted to keep. A VectorLint rule may need better wording, tighter examples, or more context before it consistently flags the right thing. You may also notice recurring issues that deserve a rule only after they have slipped through review a few times.

    With Vale, maintenance often means adjusting rule logic and testing it against real examples. With VectorLint, it often means sharpening the instruction so the review output reflects the editorial judgment you actually want.

    If you’d rather not take that on in-house, TinyRocket helps developer tool startups set up and manage their content production workflows.

    We build a repeatable content production workflow to help developer tool startups produce quality content quickly, grow developer trust, and improve search discoverability.

    We automate content research, drafting, review, repurposing, and distribution, so you focus on the value you want to convey rather than the pipeline itself.

    Get in touch, and let’s talk through what that looks like for you.

  • Introducing VectorLint: A Docs Audit & Monitoring Platform

    Introducing VectorLint: A Docs Audit & Monitoring Platform

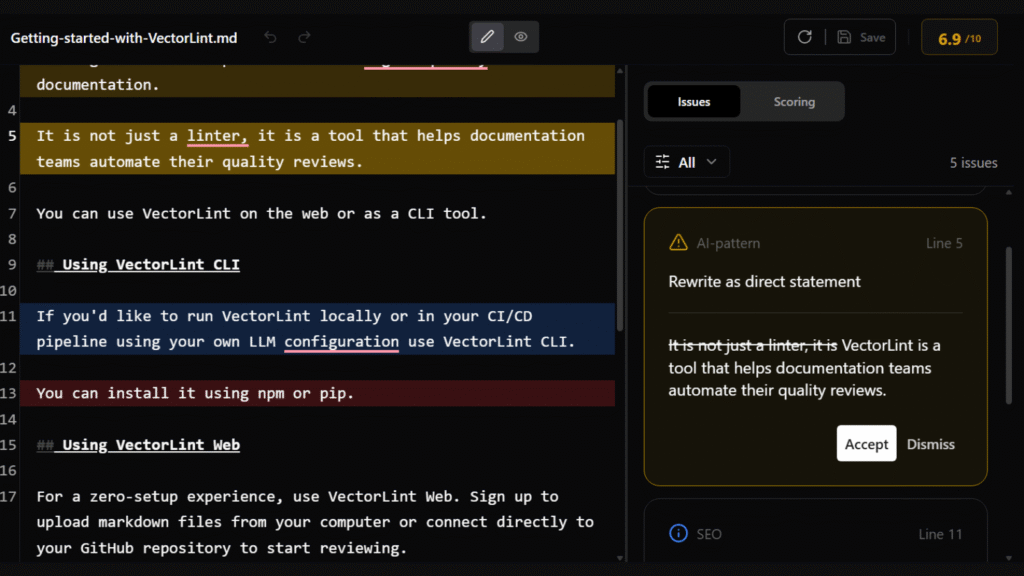
    We are excited to announce VectorLint, a platform that automatically audits your documentation quality and gives you the ability to track improvements over time.

    Every great product experience starts with documentation that feels intentional and personal. It is clear, consistent, and genuinely helpful. But as more contributors get involved, maintaining that standard becomes increasingly difficult.

    Even with a style guide in place, contributors rarely consult it every time they write. They likely read it once and may not even remember to enforce everything as they work.

    This means every new page, contributor, and update is a chance for quality to slip without anyone realizing. Without a way to consistently enforce standards, these small drifts eventually lead to major documentation issues that could break customers’ trust

    This is why we built VectorLint.

    VectorLint applies your style guides and quality standards across every document, flags what needs attention, and tracks your quality score, showing how your documentation quality improves over time. You get enough information to connect your efforts to business outcomes and see exactly how your work moves the needle.

    Add Your Documents

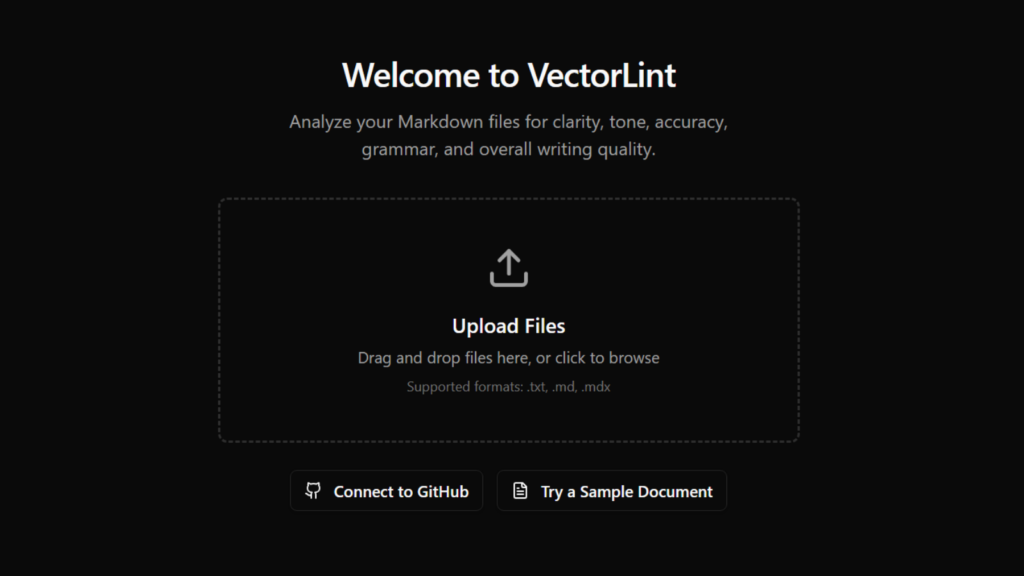
    Sign up and start adding your markdown files immediately. You can upload from your device, paste content directly, or drag and drop. VectorLint accepts .md, .mdx, and .txt files.

    Audit and Fix Issues

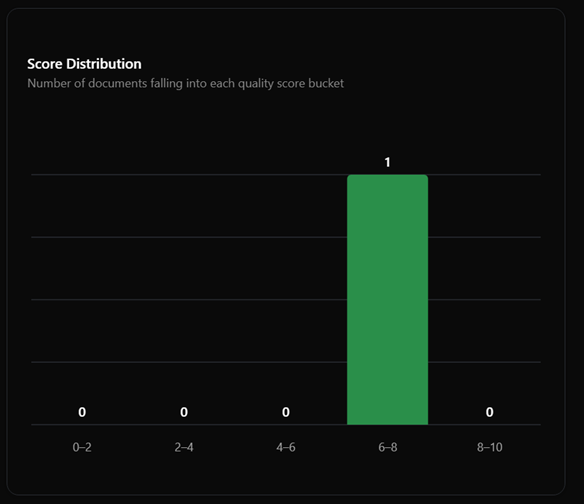
    Once you’ve added your files, you can run an audit, and VectorLint returns a quality score along with a detailed breakdown of every issue found. The breakdown includes the issue type (e.g., Readability, Accuracy), the severity level, the exact line it applies to, a clear explanation, and a suggested fix. You can accept or dismiss the suggestion.

    Rules

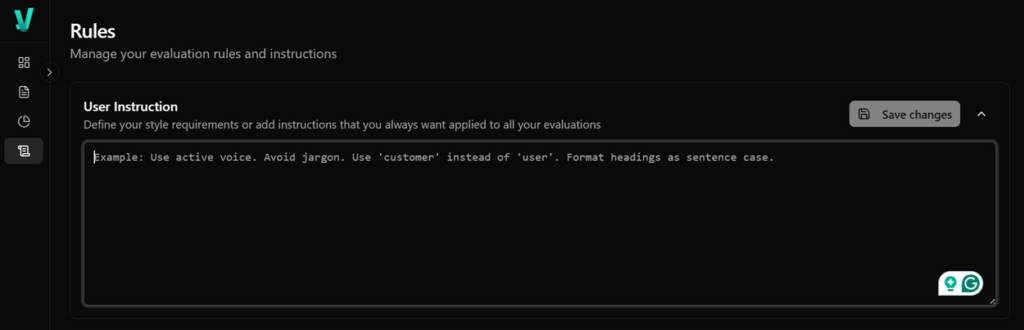
    VectorLint gives you full control over the quality checks applied to your documentation. Your rules are written in plain English. There is no regex, no config files, and no special syntax to learn.

    We’ve made it easy to define your standards using these three features:

    Style Instructions

    Your style instructions are a set of requirements you want applied to every evaluation, across all your files. You can have your full style guide here, or just the key preferences you want consistently enforced.

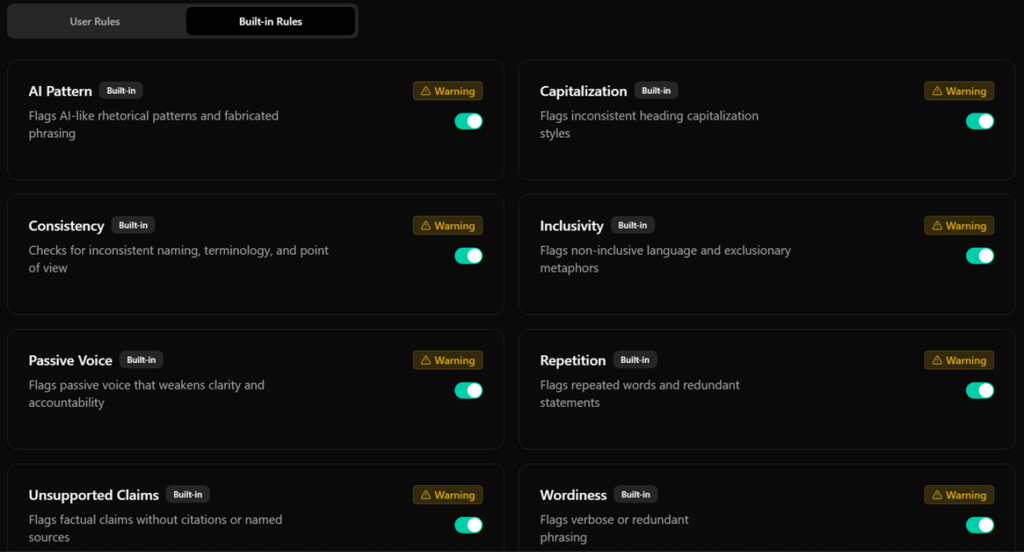
    Built-in Rules

    VectorLint comes with preset rules targeting common documentation issues to get you started.

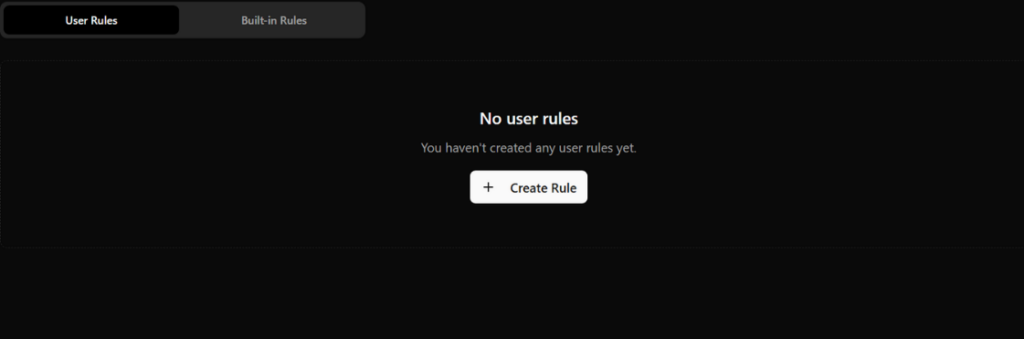
    User Rules

    You can add custom rules to enforce requirements specific to your team.

    Dashboard

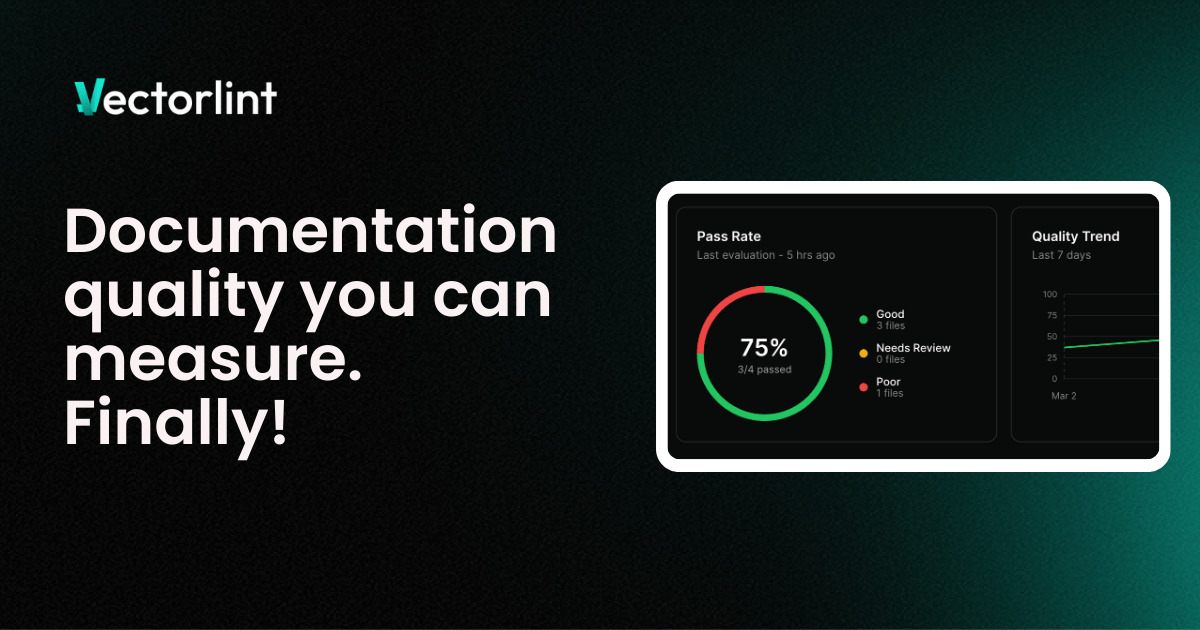
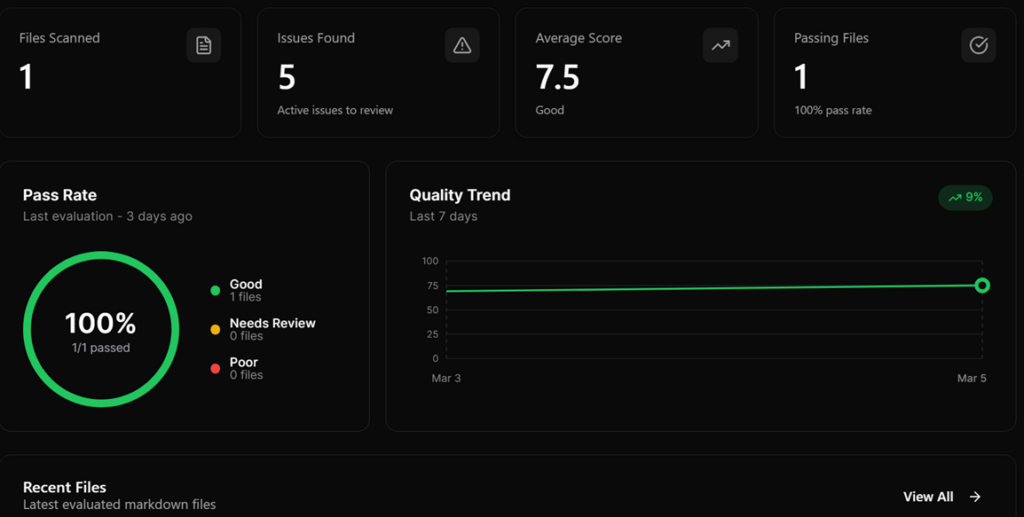
    The Dashboard shows your documentation health at a glance. You’ll see your pass rate, divided into Good, Needs Review, and Poor, and a quality trend chart tracking your progress over the last week.

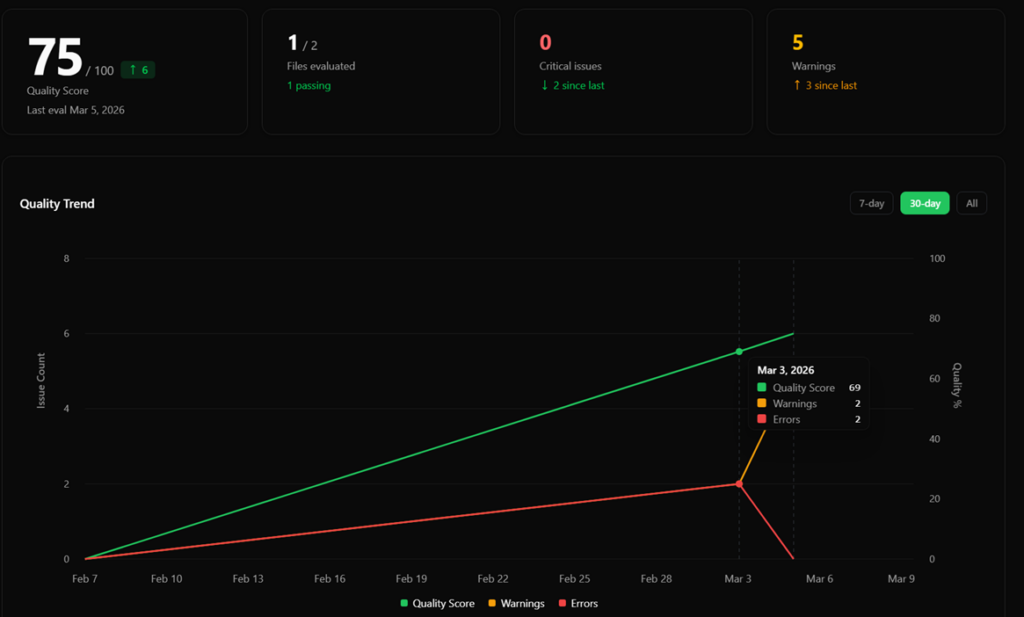
    Quality Reports

    The Reports page is where you’ll find the big picture. It shows your documentation quality trend over time, with detailed stats for your quality score, the number of files evaluated, and issue counts.

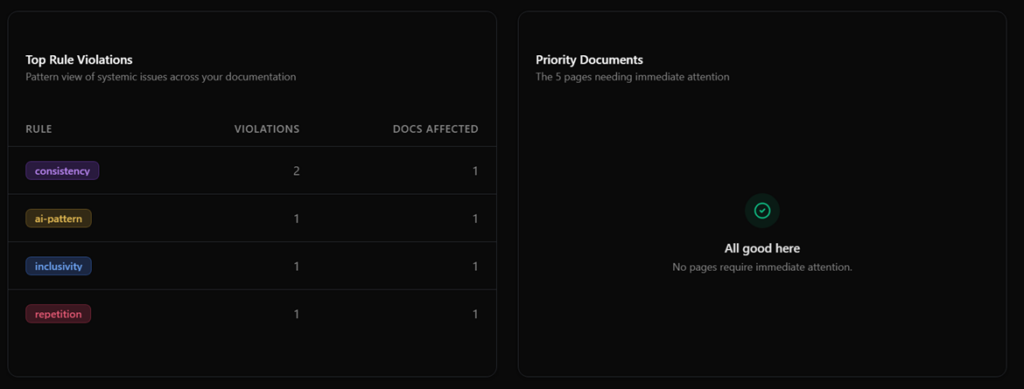
    You can also spot patterns with the Top Rule Violations table and see which pages need immediate attention in the Priority Documents list.

    What’s Coming Next?

    We’re shipping fast. Here’s what’s already in the pipeline:

    GitHub Integration — Connect your repositories and run quality audits automatically on every pull request. VectorLint will post results directly as PR comments and check runs. Your documentation gets reviewed alongside your code.

    Try It Today

    We built VectorLint because we believe documentation deserves the same automated quality standards as code. Sign up, add a file, and see your quality score in seconds.

    Get started now →

  • How to Scale Technical Content Production with AI (Without the Slop)

    How to Scale Technical Content Production with AI (Without the Slop)

    AI can help write content faster, but churning out AI-generated content isn’t enough for technical audiences who value quality.

    To scale content without sacrificing quality, you need to use AI in the three stages of content creation:

    • Research
    • Writing
    • Editing

    Using AI for Research

    Research and content briefs are the foundation of quality content, but they’re also time-consuming. Before you create a valuable guide or documentation update, you need to identify what your audience needs to know, understand what’s already been written, and gather information from multiple credible sources. This research phase can take hours.

    Now, with AI research tools such as ChatGPT, Perplexity, or Claude, this timeline can be reduced to minutes. Rather than manually reviewing competitor documentation, blog posts, and technical resources, AI extracts key insights and returns them with source citations for verification.

    You get a solid foundation of relevant information without spending hours hunting for it.

    Creating Content Using AI + Templates

    Creating content from scratch every time is slow and mentally exhausting.

    Each piece requires you to make the same decisions repeatedly, what structure works, how much detail to include, and what tone to use, adding cognitive overhead that slows production and creates inconsistency.

    Using templates for different content types solves this. By defining your content baseline, you can create more consistent, high-quality content using AI.

    You can use LLM chat apps like ChatGPT or Claude to analyze your best-performing content or industry examples, identifying the patterns that make them effective, and turn them into templates. Include the templates in your content-generation prompts to produce content that adheres to the proven structure and quality standards you’ve defined.

    This ensures AI-generated content matches your quality standards from the first draft, reducing the need for extensive rewrites.

    Using AI to Review Content

    Most people use naive techniques when reviewing content with AI.

    They paste content into ChatGPT with vague prompts such as “review this” or “make this better,” without specifying the standards or criteria to evaluate against. This results in inconsistent feedback across reviews, making it unreliable as a quality gate.

    To get more reliable reviews, create a review checklist based on your style guide and include it in your review prompt. A review checklist breaks down your quality standards into actionable items that the LLM can use to identify issues and suggest fixes to them.

    Beyond manually pasting review prompts, you can automate the review process using prose linters like VectorLint in GitHub Actions. This ensures consistent evaluations and style enforcement across your team, with every piece of content automatically reviewed against your style guide before reaching human reviewers.

    Catching style and quality issues at multiple stages of your workflow reduces review cycles and enables faster content delivery.

    Start Small, Scale Gradually

    You don’t need to implement all three strategies at once to see results. Start with research, then add templates, and finally automate the review process.

    Use Perplexity or Claude to generate research reports that you can feed directly into your content generation AI. This ensures the AI only cites information from your research, making the output more accurate. Verify key facts and technical details before using the research in production content.

    You can start with publicly available templates or use an LLM tool to generate templates from proven content, then include them in your content-generation prompts to produce cleaner drafts.

    Start with ChatGPT and a review checklist based on your style guide to speed up your review process. If you use a Docs as Code workflow, implement automated reviews in GitHub Actions using prose linters such as Vale, Markdownlint, and VectorLint.

    AI-assisted research, template-driven content, and automated review workflows are all you need to scale your content strategy.

  • Using VectorLint to Catch AI Content Patterns in Docs as Code

    Using VectorLint to Catch AI Content Patterns in Docs as Code

    When you use AI to draft documentation, whether tutorials, guides, or API references, you save hours of writing time.

    The problem is that AI-generated content often contains AI patterns that could erode developer trust:

    “It’s important to note that…”
    “In the landscape of software development…”
    “This isn’t just X; it’s Y.”

    Even when your content is technically accurate, these patterns make it sound lazy.

    You could manually review every piece of content to catch these patterns, or you could automate your review process to catch them instantly.

    This guide shows you how to use VectorLint to automatically check for AI patterns in your Docs as Code workflow.

    VectorLint, AI-Assisted Editing

    VectorLint is an AI-powered prose linter that enables natural-language standard enforcement.

    It uses LLM-as-a-Judge to evaluate content and catch quality issues, making it possible to catch issues like terminology and spelling errors that only require pattern matching, and also those that require contextual understanding, such as AI patterns, Search Engine Optimization (SEO) problems, and technical accuracy.

    As a command-line tool, it runs in CI/CD pipelines, enabling a shared quality gate across your teams, preventing errors from reaching production.

    To get started, install VectorLint on your computer.

    Installing VectorLint

    1. Install VectorLint: To install VectorLint globally, run:
       npm install -g vectorlint

    Verify installation:

       vectorlint --version

    Alternatively, you can run it directly using npx:

       npx vectorlint

    Configuration

    Before you can review content with VectorLint, you need to connect it to an LLM provider.

    1. Initialize VectorLint: Run the initialization command to generate your configuration files:
       vectorlint init

    This creates two files, .vectorlint.ini which contains project-specific settings
    and ~/.vectorlint/config.toml where you configure your LLM provider settings.

       # VectorLint Configuration
       # Global settings
       RulesPath=
       Concurrency=4
       DefaultSeverity=warning
    
       # Default rules for all markdown files
       [**/*.md]
       RunRules=VectorLint

    This configuration tells VectorLint to check all Markdown files using the bundled VectorLint preset.

    1. Configure your API keys: Open your global config file (~/.vectorlint/config.toml) and uncomment the section for your preferred LLM provider. VectorLint supports OpenAI, Anthropic, Google, and Azure models.
       # --- Option 1: OpenAI (Standard) ---
       # LLM_PROVIDER = "openai"
       # OPENAI_API_KEY = "sk-..."
       # OPENAI_MODEL = "gpt-4o"
       # OPENAI_TEMPERATURE = "0.2"
    
       # --- Option 2: Azure OpenAI ---
       # LLM_PROVIDER = "azure-openai"
       # AZURE_OPENAI_API_KEY = "your-api-key-here"
       # ...
    
       # --- Option 3: Anthropic Claude ---
       # LLM_PROVIDER = "anthropic"
       # ANTHROPIC_API_KEY = "your-anthropic-api-key-here"
       # ...
    
       # --- Option 4: Google Gemini ---
       # LLM_PROVIDER = "gemini"
       # GEMINI_API_KEY = "your-gemini-api-key-here"
       # ...

    Uncomment your preferred provider and add your API key. See the configuration guide for full details.

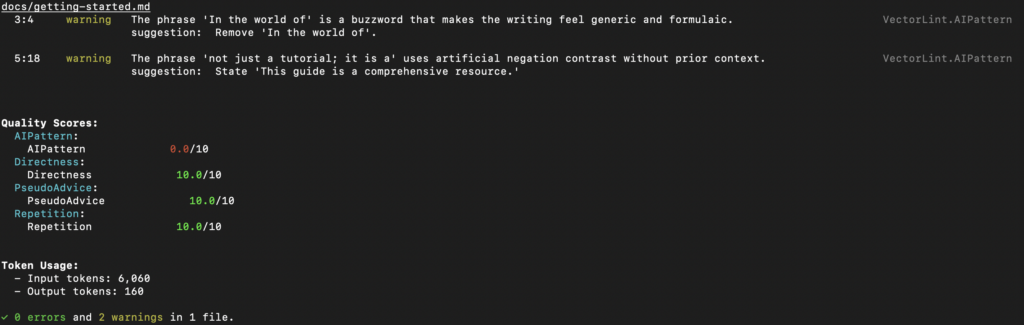
    1. Create a test file: Create docs/getting-started.md with some content containing AI patterns:
       # Getting Started
    
       In the world of software development, getting started with any new tool can be daunting.
    
       This guide is not just a tutorial; it is a comprehensive resource for developers.
    1. Configure AI pattern detection: VectorLint comes bundled with a VectorLint preset that includes AI pattern detection rules. The init command automatically configures this in your .vectorlint.ini file. The VectorLint preset includes these rules: AI-Pattern, Directness, PseudoAdvice, and Repetition. Rules in rule packs are automatically enabled unless explicitly turned off. For this guide, you only need the AI-Pattern rule, so turn off the others in your .vectorlint.ini:
       [VectorLint]
       Directness = disabled
       PseudoAdvice = disabled
       Repetition = disabled

    Running Your First VectorLint Check

    To run VectorLint on a file, use the command:

    vectorlint docs/getting-started.md

    VectorLint should output a quality report in your terminal:

    Adding VectorLint to Your CI/CD Pipeline

    Integrate VectorLint into your GitHub Actions workflow to automatically check documentation on every pull request.

    To add VectorLint to your CI/CD pipeline, create .github/workflows/lint-docs.yml:

    name: Lint Documentation
    on: [pull_request]
    
    jobs:
      vectorlint:
        runs-on: ubuntu-latest
        env:
          OPENAI_API_KEY: ${{ secrets.OPENAI_API_KEY }}
        steps:
          - uses: actions/checkout@v3
    
          - name: Setup Node
            uses: actions/setup-node@v3
            with:
              node-version: '18'
    
          - name: Run VectorLint
            run: npx vectorlint docs/*.md

    This workflow runs VectorLint on every pull request, checking all modified Markdown files against your quality rules. If VectorLint finds quality issues, the build fails, and the quality report appears in the PR comments.

    Next Steps

    You’ve now automated the detection of excessive hedging in your documentation. But there are more AI patterns worth catching:

    Expand your rule pack:

    • Define rules that match your company’s style guide
    • Share your rule packs across repositories
    • Use VectorLint scores as a metric for documentation quality

    By creating more rules, you can automate more quality checks and save time on content review. This helps you keep up with development velocity while maintaining the quality and trust your brand depends on.

  • You Need an AI Prose Linter in Your Docs as Code Workflow

    You Need an AI Prose Linter in Your Docs as Code Workflow

    With LLMs now capable of creating and reviewing content at scale, your Docs as Code workflow is incomplete without an AI prose linter.

    Although traditional prose linters can catch many errors, their syntactic approach means they can’t catch errors that require contextual judgment.

    To solve this problem, many teams use LLM-powered apps like ChatGPT or Claude. However, this remains outside the team’s shared automated testing workflow, resulting in inconsistent quality.

    These apps aren’t tuned for consistent evaluations, and different team members use different prompts and processes. Even with a shared prompt library, you’re still relying on each contributor to use it correctly.

    An AI prose linter solves this by providing AI reviews and suggestions in your Docs-as-Code workflow. You can achieve reliable automated quality checks by setting the LLM to low temperatures, using structured prompts, and configuring severity levels.

    Making AI Prose Linters Reliable With Severity Levels

    AI prose linters inherit the non-determinism of their underlying technology, which means they will occasionally generate false positives.

    Because the whole point of a CI pipeline is to deliver reliable builds, this is a bad recipe for your pipeline. The solution is to configure them as non-blocking checks that highlight potential issues and suggest fixes without failing your build.

    Just like traditional prose linters aren’t perfect, AI prose linters don’t need to be either.

    Even if you get 50% accuracy on quality flags, you’d be saving half the time you’d otherwise spend hunting for them yourself.

    With that out of the way, here are four reasons you should adopt an AI prose linter in your Docs as Code workflow.

    1. It Reduces Time Spent on Reviews

    AI prose linters reduce the time spent on manual content reviews by catching contextual issues that typically require human judgment.

    While traditional prose linters can catch terminology and consistency issues, the bulk of review time is typically spent on editorial feedback. This involves identifying issues that require contextual judgment, such as whether there is repetition of concepts across sections or if content directly answers the reader’s question.

    By codifying these editorial standards into AI prose linter instructions, you can catch these issues locally or in the CI pipeline, and get suggested fixes. This reduces the mental load on reviewers and saves time.

    2. It Enables Broader Team Contribution

    AI prose linting enables developers, engineers, and product managers to contribute high-quality documentation by providing them with immediate, expert-level editorial feedback as they write.

    Technical writers are often stretched, with some teams operating at a 200:1 developer-to-writer ratio. To get documentation up to date promptly, non-writers often need to contribute. While you can save a lot of time with traditional linters catching typos and broken links, you can make contributing even easier by using AI prose linting.

    Not only does it broaden the scope of issues you catch, but it also helps contributors learn the reason behind the flags and provides them with suggestions to fix them, making them more confident in their contributions.

    3. It Lowers the Barrier to Docs as Code

    Teams who don’t have a dedicated documentation engineer often refrain from adopting a Docs as Code workflow because of its maintenance overhead. It often requires an ongoing effort to create and maintain rules as the team creates more content.

    While traditional linters often have preset style rules that you can start with, you’ll still need to maintain them to deal with false positives that block merges, or to catch new issues that come up.

    AI prose linters solve this problem by using natural language instructions to define rules. This enables you to catch a wide range of issues with fewer instructions, reducing the maintenance overhead.

    For instance, if you wanted to catch hedging language using Vale, you’d need to write a regular expression covering as many variations as you can think of such as `appears to`, `seems like`, `mostly`, `I think`, `sort of`, etc.

    With an AI prose linter, you can simply write:

    `Check for any phrase that connotes uncertainty or lack of confidence (for example, “appears to”, “seems like”)`

    And it can catch variations you never thought to list.

    The trade-off is that natural language tends to leave room for edge cases, and so without precise instruction, you can get false positives. However, the cost of maintaining a wide library of rules or trying to envisage every edge case far outweighs the cost of filtering out false positives.

    4. It Accelerates Productivity For Solo Writers

    To achieve high-quality, error-free content, solo writers still have to review their own work. However, the biggest hurdle isn’t a lack of skill; it’s the human factor. When you’re the only person writing and editing thousands of lines of documentation, you lose the “fresh eyes” benefit that teams take for granted.

    After the fifth hour of editing a technical guide, fatigue sets in, making it easy to miss quality issues. An AI prose linter serves as a peer reviewer, turning the review process into simple “yes” or “no” decisions.

    The AI highlights the issues, and you decide whether they’re valid quality issues or not. This is less mentally taxing and faster than if you had to find the issues yourself.

    Knowing you have an automated editorial pass gives you confidence, allowing you to focus on providing value rather than worrying if you’ve missed a subtle stylistic error.

    Using VectorLint, an Open Source AI Prose Linter

    VectorLint is the first command-line AI prose linting tool.

    We built it to integrate with existing Docs-as-Code tooling, giving your team a shared, automated way to catch contextual quality issues alongside your traditional linters.

    You can define rules in Markdown to check for SEO optimization, AI-generated patterns, technical accuracy, or tone consistency, practically any quality standard you can describe objectively.

    Like Vale or other linters you already use, VectorLint runs in your terminal and CI/CD pipeline as part of your standard testing workflow.

    Check it out on Github

  • Review Checklist, Why You Need One

    Review Checklist, Why You Need One

    For technical startups, you need to publish quality content consistently for your developer audience to trust you. However, endless review cycle creates bottlenecks that slow down your entire content operation and make consistency nearly impossible to maintain.

    But what if you could integrate the review process into your workflow from the start? What if writers and reviewers were already on the same page, checking for the same things, before content even reaches the review stage?

    That’s exactly what a content review checklist does. It’s a simple tool that ensures every writer complies with your style guide even before submission, cutting down review cycles and maintaining consistent quality across all your content.

    In this article, you’ll learn what a content review checklist is, why you need one, and how to create one and use it in your workflow.

    What Is a Content Review Checklist?

    A content review checklist is a structured list of specific items used to evaluate each piece of content before publication. It turns writing and formatting standards into clear, actionable checkpoints that reviewers can verify one by one.

    While a style guide defines your overall writing and formatting standards, a checklist converts them into quick itemized checks for writers and reviewers, covering key elements such as grammar, tone, spelling, brand voice, formatting, and SEO considerations.

    In essence, a checklist gives your team a quick, simple, and repeatable way to ensure every piece of content meets set standards without missing critical details.

    Consistent Quality and Voice Across Content

    When multiple contributors are involved, each writer applies their own interpretation of quality standards. One contributor might prioritize technical accuracy while another focuses on readability, leading to your content feeling inconsistent and unprofessional.

    Your audience won’t know what to expect from you, and for technical startups this is especially damaging because trust and credibility drive user adoption.

    However, implementing a review checklist before publication solves this problem by providing a unified quality benchmark. Every piece of content, whether written by in-house writers or guest contributors, passes through the same checks.

    Faster, Smoother Reviews

    Review cycles are often the biggest bottleneck in technical content operations. Writers wait for feedback while reviewers catch new errors in each round, creating frustrating back-and-forth delays.

    A content review checklist eliminates much of that friction.Writers can self-check their content against established criteria before submission, catching issues before they get to the reviewer’s desk. As a result, review iterations drop, rework decreases, and teams ship content faster while maintaining quality.

    Easier Scaling and Onboarding

    As your content operations grow, maintaining content quality as you onboard new writers becomes more challenging. New contributors face a learning curve before they can adapt to your writing style and brand voice, which adds pressure on reviewers and slows content production.

    But with a review checklist, new contributors get a roadmap of what “good” looks like and produce publishable content faster with less supervision. Hence, your checklist serves as a built-in training resource that lets you scale your content program without sacrificing consistency or burning out reviewers.

    Creating a Checklist from Your Style Guide

    If you already have a style guide, you can quickly convert it into an actionable checklist using this ChatGPT prompt:

    You are a content operations expert tasked with converting a style guide into a practical, actionable review checklist. Your goal is to transform style guide principles into specific, checkable items that writers can use for self-review and reviewers can use for quality verification.
    
    **Your Task:** Analyze the provided style guide and create a comprehensive content review checklist that ensures consistent quality, voice, and brand compliance across all content.
    
    **Input:** [Paste your complete style guide here]
    
    **Checklist Reqirement:**
    
    1. **Structure the checklist into clear categories** such as:
        - Brand Voice & Tone
        - Technical Accuracy
        - Formatting & Structure
        - SEO & Optimization
        - Grammar & Language
        - Visual Elements
        - Compliance & Legal
    2. **Make each item actionable and specific** - avoid vague statements like "check tone" and instead use specific criteria like "Does the content use active voice in at least 80% of sentences?"
    3. **Include binary yes/no checks** where possible, making it easy to verify compliance
    4. **Add brief explanations** for complex items that might need clarification
    5. **Prioritize items** by marking critical must-haves vs. nice-to-haves
    6. **Make it scalable** - suitable for both new contributors and experienced writers
    7. **Keep it practical** - aim for a checklist that takes 10-15 minutes to complete
    
    **Desired Output Format:**
    
    - Organized by category with clear headings
    - Checkbox format for easy use
    - Brief explanations where needed
    - Estimated time to complete each section
    - Priority levels (Critical/Important/Optional)
    
    **Additional Context:** This checklist will be used by [describe your team size, content types, and frequency]. The goal is to reduce review cycles, maintain consistency, and help new contributors produce publishable content faster.```
    

    Using Your Checklist

    The usual way to implement a checklist is for writers and reviewers to systematically work through each item, marking it complete before submission and publication.

    This approach helps prevent oversights and reduces unnecessary back-and-forth. However, manual checking is time-consuming, and under deadline pressure, it’s easy to skip items or rush through them.

    To reduce this burden, some teams try to automate the process with AI. They provide the content and checklist to tools like ChatGPT and ask it to evaluate each item.

    ChatGPT flags issues that need attention, which speeds up the review process compared to manual checking.

    But this approach has its limitations. You’re still manually copying and pasting content for every single piece, which creates friction and takes time. There’s no workflow integration, so it’s easy to skip this step entirely when deadlines are tight.

    Then there’s the consistency issue with generative AI models. The same content can receive different feedback across runs.

    Generative AI models may also miss nuanced issues a human would catch, or hallucinate problems that do not exist.

    Your Checklist, On Autopilot with VectorLint

    Instead of manually running checks, what if your checklist ran automatically on every content submission? That’s where VectorLint comes in.

    VectorLint is an LLM-powered prose linter that automates content quality checks. Think of it like Vale, but for content quality issues that require understanding context not just pattern matching, such as weak headlines, AI-generated writing patterns, unclear value propositions, etc.

    How VectorLint Works

    Convert your review checklist into automated rules that run in your CI/CD pipeline. Define checklist items as evaluation rules in simple Markdown files using natural language, then configure which rules apply to which content types.

    For example, if your checklist includes “Avoid unnecessary repetition that doesn’t add value,” you can create a VectorLint rule that detects redundant phrases and explanations. The rule flags content where points are repeated without adding new information.

    VectorLint flagging redundant phrasing in an earlier draft of this article

    VectorLint runs automatically on every content submission via pull requests, commits, or any CI/CD trigger you configure. Content that doesn’t meet your standards gets blocked before reaching human reviewers, just like a failing test blocks a code merge.

    This way, writers get immediate, consistent feedback and quality standards are enforced uniformly across all contributors.

    VectorLint is open source and built by TinyRocket to help technical teams ship quality content faster. Need help with setup or custom rules? We’ll get you up and running.

  • The Easiest Way to Maintain Doc Quality With Several Contributors

    The Easiest Way to Maintain Doc Quality With Several Contributors

    Maintaining documentation quality is challenging when multiple contributors are involved. Each contributor brings their own writing habits, and small inconsistencies start to build up across the docs.

    Over time, this work shifts to editors. They spend hours each week fixing the same basic issues like terminology inconsistencies, formatting problems, and style mismatches which slows down updates.

    Editors spend significant time fixing style mismatches, causing documentation to lag behind active development.

    This article will show you how your team can maintain consistent documentation quality with multiple contributors, without burning hours and mental energy.

    What is Even Documentation Quality?

    Quality documentation gives readers what they want and expect. When developers and technical users come to your docs, they have expectations shaped by their goals and past experiences with technical documentation that works.

    Industry surveys reveal six fundamental expectations that define doc quality:

    1. Technical accuracy and completeness

    This criterion tops every list because readers expect your documentation to accurately reflect how the product works, including prerequisites, limitations, and edge cases.

    When they follow your instructions and encounter errors due to inaccurate or incomplete information, it makes them lose confidence in your product.

    2. Up-to-date and maintained content

    Your documentation should evolve with your product, staying current with new features, updated APIs, and best practices.

    Outdated instructions, broken links, or screenshots showing an outdated UI not only waste readers’ time but also signal neglect, which erodes trust and confidence in your product.

    3. Practical examples and guidance

    Simply describing features without context is not enough to show developers how to use your tool. They need to understand how those features fit into real workflows and how to troubleshoot errors when they don’t behave as expected.

    Developers find it helpful to have common use cases, integration patterns with popular tools, and clear troubleshooting flows for known issues.

    4. Clear structure and findability

    Developers are often under tight deadlines and need to find answers quickly without having to read through the entire piece of content.

    Hence, your docs should prioritize speed to value by following a consistent, logical structure with headings that reflect common tasks or user intent.

    For example, “How do I migrate from X?” or “Integrating with Y,” rather than just listing features. Effective search and predictable organization help users locate information efficiently and get back to work faster.

    5. Consistent terminology

    When one article uses “API key” and another uses “access token” for the same concept, readers have to stop and verify whether these are different things, interrupting their workflow and causing unnecessary cognitive load.

    They expect to learn your system’s vocabulary once and apply it everywhere. Inconsistent terminology signals a lack of coordination and erodes trust in the documentation’s reliability.

    6. Clarity and conciseness

    The goal is to help your readers quickly understand and apply information. Hence, your documentation should use clear, simple language, and explain technical jargon when first introduced.

    Sentences should be direct, instructions actionable, and content free of unnecessary repetition.

    Where Doc Quality Problems Appear with Several Contributors

    Documentation quality issues often appear in environments like the ones below.

    Open Source Projects with Community Contributors

    Open source projects often receive documentation contributions from people with diverse backgrounds.

    They bring different writing styles, spelling conventions, formatting preferences, and terminology choices that usually do not align with your project’s preferred style.

    When you receive several open-source documentation PRs each month, correcting terminology, formatting, and style in each one can take hours. Furthermore, errors slip through when maintainers are overwhelmed.

    Engineering Teams with One Technical Writer

    Some teams have one technical writing expert maintaining the documentation contributions from dozens of engineers.

    These engineers are engineers first and writers second, so their writing skills vary. And because documentation isn’t their primary work, they don’t have the time to master style guides and writing conventions, which inevitably leads to quality issues.

    This puts a heavy load on the technical writer. As contributions stack up, they spend days correcting basic style violations, inconsistent terminology, improper heading hierarchy, and tone mismatches before they can even assess whether the technical content is accurate.

    Meanwhile, engineers wait days for feedback on their contributions. In high-velocity teams shipping features weekly, documentation falls behind because the writer can’t keep pace with the volume of corrections.

    Existing Solutions

    Manual Review

    Many editors have a checklist of quality checks to review, usually including passive voice, terminology, heading hierarchy, code formatting, and technical accuracy. The process usually involves reading through content multiple times, focusing on different aspects each pass.

    This method works because it allows the reviewer to concentrate on the most critical quality issues. However, it becomes unsustainable when there are large volumes of contributions from multiple writers.

    Manual review is time-consuming and mentally exhausting, and as fatigue sets in, even experienced editors may miss errors or inconsistencies despite their best efforts.

    Prose linters (Vale, Markdownlint)

    Prose linters are automated tools that scan writing for style and formatting issues based on predefined rules. They help teams catch problems early and enforce consistency across documentation.

    Vale is the most popular prose linter. It automates style checks using configurable rules, catching terminology mistakes, formatting issues, and other objective errors. Markdownlint focuses on structural checks, such as heading hierarchy, spacing, and list formatting.

    These tools are genuinely useful because once the rules are set up, they apply them automatically to every contribution, removing a lot of repetitive manual checking.

    However, getting Vale running well takes significant configuration effort. Teams often spend weeks defining rules, and that upfront work becomes a barrier to adoption.

    As documentation grows, the maintenance burden also increases. Edge cases show up, rules need refinement, and false positives appear when valid writing gets flagged because the tool can’t interpret context.

    In addition, proselinters only catch objective issues, such as consistency in terminology and formatting. Subjective areas that require contextual understanding, such as clarity, tone, explanation quality, and technical accuracy, are left for human review, which takes time.

    LLM + Checklists

    LLMs understand context in ways rule-based proselinters can’t. For example, they can tell when passive voice is acceptable in a technical explanation and when active voice would make a tutorial clearer.

    As a result, many teams pair LLMs with their existing checklists. They paste content into ChatGPT, include the checklist, and ask it to review the writing.

    However, this approach is a naive use of LLMs. Their output isn’t consistent, and you can’t reliably predict or reproduce the results.

    The same prompt can generate different responses across runs, and without structured prompting and controlled settings, the feedback varies widely. As a result, LLMs often miss important quality issues.

    A Better Way to Do Things

    Although these existing quality tools save time, they still leave quality gaps. Rule-based tools miss issues that require contextual understanding, while basic LLM use is inconsistent and unpredictable. You need a system that combines automation with intelligent judgment.

    VectorLint fills this gap. It’s an LLM-powered prose linter that evaluates subjective qualities like clarity, tone, and technical accuracy, nuances that regex rules miss.

    By using structured rubrics at low temperatures, VectorLint provides consistent, actionable feedback that addresses LLMs’ unpredictability.

    Setup is simple: describe your standards in natural language, and VectorLint enforces them in your CI/CD pipeline.

    Think of it as a complementary system to Vale. Use Vale for the rigid objective rules, and VectorLint for the intelligent subjective review. This combination saves editors even more work hours to focus on strategy instead of style policing.

    At TinyRocket, we built VectorLint to solve this exact problem. We work with teams to define quality standards and implement tailored docs-as-code workflows that specifically fit their needs.

    Book a call to discuss your documentation quality challenges.